Accessing the classic notification area (toolbar) Options in Windows 10

20.49 Add Comment
Accessing the classic notification area (toolbar) Options in Windows 10 -

In Windows 10, many options of classic control panel have been moved to the application settings. Many readers constantly ask me if it is possible to have the good old toolbar icons (tray) interface standard control panel. By default, Windows 10 lets you use the Settings application to display or hide application icons from the tray or customize the icons of the system. If you are interested in using the conventional options of the tray icon in Windows 10, this is what you can do.

In Windows 10, after you click the Customize button in the Taskbar properties, it opens the Settings application to the appropriate page: Windows 10 customize notification area icons

Windows 10 customize notification tray on the right side, you will find links to customize the icons and select the system icons should be visible in the system tray (notification area).

Windows 10 customize system icons However, if you want to use the old user interface of Windows 8 and Windows 7 for the same purpose, you must do the following.

  1. Press Win + R to open the Run dialog box
  2. Type the following command in the Run dialog box:
     shell ::: {05d7b0f4-2121-4eff-bf6b-ed3f69b894d9} 

    Windows 10 run old notification icons dialog

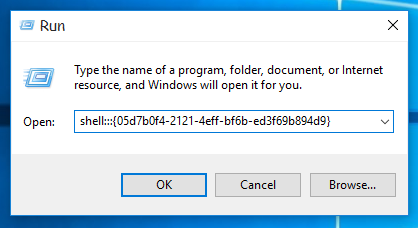
  3. After you press Enter , the good old classic interface appears: Windows 10 old notification icons dialog

at the time of this writing, this trick works as expected in the latest Windows 10 build 10240. there is no guarantee that it will be available later that Microsoft wants to kill the classic Control panel and replace it entirely with the Settings application.

Tip: For quicker access to the old dialog box, you can create a desktop shortcut and pin it to the Start menu or the taskbar. Right-click on the desktop and select New - Shortcut. Use the following command as a shortcut target:

 explorer.exe shell ::: {05d7b0f4-2121-4eff-bf6b-ed3f69b894d9} 
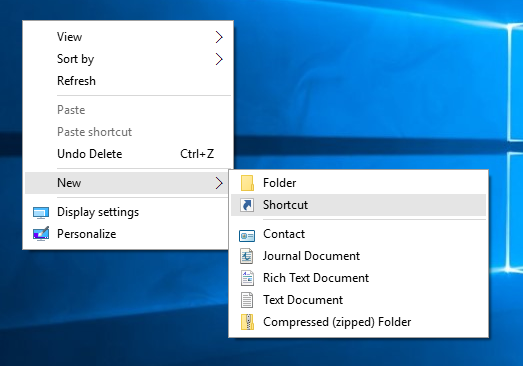
Windows 10 new shortcut context menu Windows 10 tray icons shortcut target

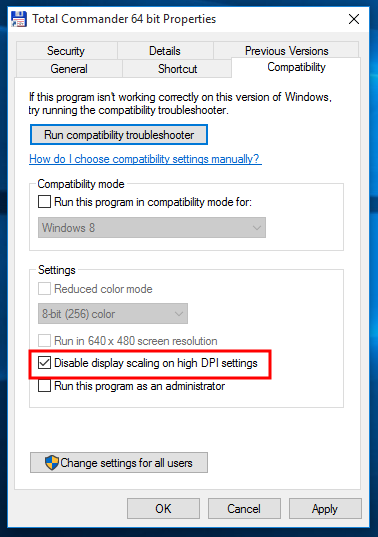
name like "notification Area Icons" icon and choose the approprtiate from the following file:

 C:  Windows  System32  taskbarcpl.dll 

Windows 10 tray icons shortcut naming Windows 10 tray icons shortcut set icon

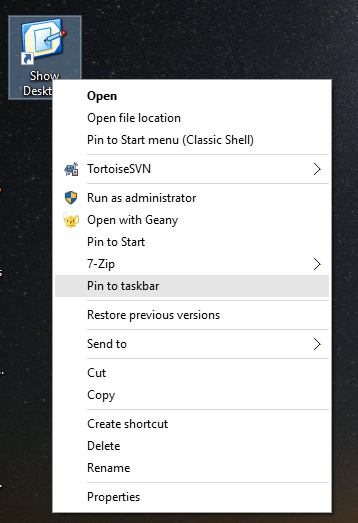
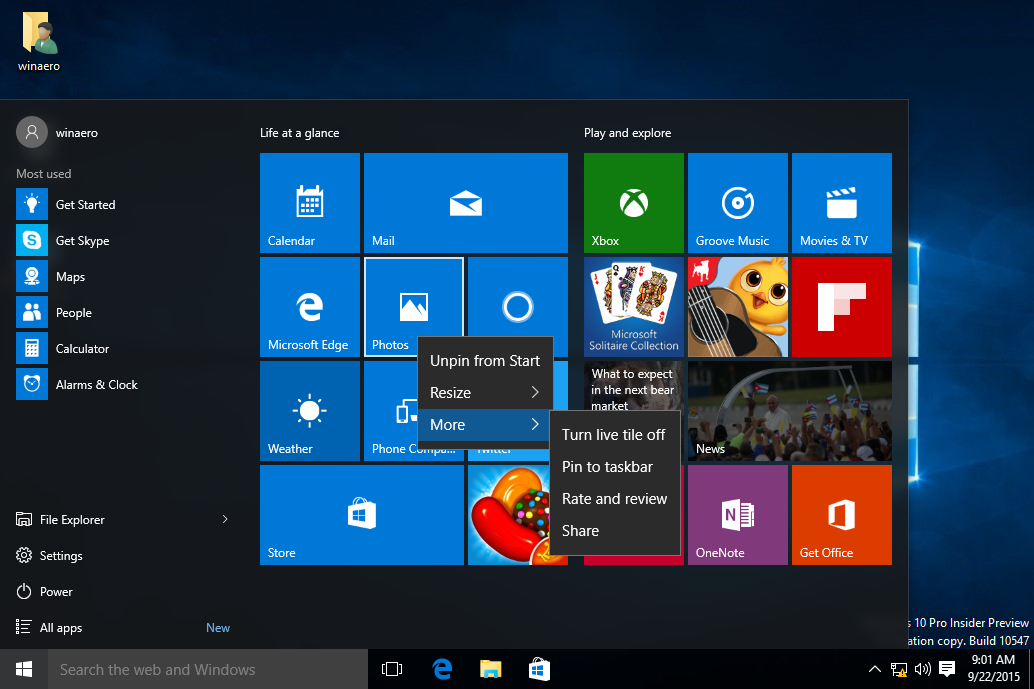
Finally, right-click the shortcut you created and pin it to the Start menu or the taskbar.

Windows 10 tray icons shortcut pin finished.

Fix blurry fonts in Windows 10

17.48 Add Comment
Fix blurry fonts in Windows 10 -

If you face the problem of fuzzy fonts in Windows 10, it can be very boring and you may not be aware of what changes Microsoft made their OS to understand why you see fuzzy fonts. Since Windows 8.1, Microsoft has changed the behavior of DPI scaling. If you are not satisfied with the outcome of your bet at the current DPI scale in Windows 10, you should try the solutions mentioned in the article.

In Windows 8.1, the "scaling style Use XP" global option has been removed. XP setting the style scale can still be used, but you must activate it on a per application. instead, when the CIO is scaled now, the most recent DPI virtualization method introduced in Vista is enabled by default for all applications! However, for applications that do climb incorrectly, fonts are blurred.

Fixed blurry fonts in Windows 10 on a per-application basis

If you experience blurry text problems in one application or just a little applications, follow these steps: ..

  1. right-click on the shortcut of these applications where you see fuzzy fonts and click Properties
  2. Go to tab compatibility
  3. Check the "Disable setting the display scale of high DPI settings. Fix blurry fonts in Windows 10 per app
  4. Click OK and now try to launch the application to see if the blurry text issue is gone.

How to fix blurry fonts in Windows 10

another thing you can try to reduce your 100% DPI settings. Here's how:

  1. Open
  2. Settings app
  3. Go to System - Display
  4. Adjust the trackbar for "Change text size, and other applications. . products "to the left position. The value must be "100%" as shown below: Fix blurry fonts in Windows 10
  5. Sign from your Windows session and sign in the back

If the result is not always what you do. wanted, try the next solution.

Fixed blurry fonts in Windows 10 by changing the scaling method.

It is possible to return to the scaling method Windows 10 uses an older, used in Windows 8 RTM and Windows 7. For many users, it provides much better results than default
to activate the old method of scaling, do the following: ..

  1. Open the Registry editor
  2. go to the following registry key
     HKEY_CURRENT_USER  Control Panel  Desktop 

    Tip :. You can access all the required registry key with one click

  3. Set the DpiScalingVer parameter to 0x00001018 as shown below: Windows 10 old DPI scaling method - DpiScalingVer
  4. Set the Win8DpiScaling parameter to 1: Windows 10 old DPI scaling method - Win8DpiScaling
  5. Create LogPixels appointed a new 32-bit DWORD value and set it to 0x00000078: Windows 10 old DPI scaling method - LogPixels
  6. now, restart Windows 10.

After restarting , you should not be affected by more blurry fonts.

I prepared tweaking registry files ready for use so you can switch between the scale of methods in a single click.

Download registry files

Merge "Windows 8 DPI method.reg" file by double clicking it to activate the legacy scaling. To cancel changes, click the DPI default file method.reg. Do not forget to reboot your PC.

Add the Show Desktop button next to Start in Windows 10

14.47 Add Comment
Add the Show Desktop button next to Start in Windows 10 -

In previous versions of Windows to Windows 7, there was a button that minimizes all open windows and showed the office. In Windows 10, there is no button. Instead, to minimize all open windows and show the desktop, you must move the mouse pointer over the right edge of the taskbar (or the bottom edge if your taskbar is vertical) and click on a tiny invisible button. In this article I want to share how you can add the Show Desktop button classic close Start in Windows 10.

This is what you do:

  1. Create a new shortcut by right-clicking an empty area of ​​the desktop -> new -> shortcut. Use the following command as the target:
     explorer.exe shell ::: {3080F0D-D7AD-11D9-BD98-0000947B0257} 

    See the following screenshot: Windows 10 show desktop

  2. Name your shortcut as "Show Desktop": Windows 10 show desktop shortcut name
  3. in the shortcut properties, set its icon in C: Windows explorer.exe Windows 10 show desktop icon
  4. Finally, right-click the shortcut you created and select "Pin to taskbar" from the context menu: Windows 10 show desktop pin to taskbar

once done, you can delete the shortcut you created and drag the item pinned next to the Start button. Now you can use the pinned icon to minimize all open windows.

Windows 10 show desktop button on the taskbar Personally, I find this more useful than the default icon button offered by Windows 10, which is at the end of the taskbar. Users can find the touch screen by adding useful button too.

There.

Boot quickly in order to safe mode in Windows 10

11.46 Add Comment
Boot quickly in order to safe mode in Windows 10 -

In Windows 10, there is a way to restart the operating system quickly and directly launch the troubleshooting options. This is very useful if you have a problem you can not fix in the Windows 10 regular environment. For example, you may need to overwrite or delete files in use. He is a very good alternative to a DVD or USB drive bootable. In this article I want to share how to quickly access the command prompt for troubleshooting in Windows 10.

To start quickly in order to safe mode in Windows 10, follow the instructions below .

  1. Open the Start menu.
  2. Click on the power button and move the mouse pointer on the restart element, but do not click it. Restart Windows 10 to command prompt 01
  3. Press and hold key Shift on the keyboard, then click the Restart option. Make sure you hold the Shift key before you click the Restart option.

The operating system will reboot into advanced boot options. From there it's easy to get in safe mode with the mode command prompt.

Windows 10 advanced startup options

  1. Click Troubleshoot element.
  2. Click Advanced Options on the next screen. Windows 10 troubleshoot
  3. Finally, click on the command prompt item. Windows 10 advanced

Your PC restarts. After that, you will be prompted to choose the account to log: Windows 10 command prompt sign in

Once connected, the command prompt will be opened as an administrator. Windows 10 command prompt only mode

There.

How to make Windows 10 Show familiar desktop icons

20.45 Add Comment
How to make Windows 10 Show familiar desktop icons -

In earlier versions of Windows, the desktop icons were significant enabled by default - Computer (now known as this PC), Network, My Documents were all visible by default. However, in modern versions of Windows, Microsoft has made most of these hidden icons. In Windows 10, only the Recycle Bin is present on the desktop by default. In addition, the Start menu of Windows 10 does not have links to these icons either. Let's see how to add the classic return desktop icons in Windows 10.

In versions of Windows prior to Windows 10, it was relatively simple. Windows 8.1 came again with the classic "Customize" in the Desktop menu. There was a link there to open the dialog box icons of the office where the user can activate the desired icons.

But in Windows 10, Microsoft removed the classical element Personalize from the shortcut menu on the desktop. Once you click on "Customize", it will open the Settings app, where you can get lost finding the office link icon

To make Windows 10 shows the classic dialog desktop icons, you must do the following :.

  1. Open the application settings
  2. Go to Customize -> Themes
    Tip :. You can open this page directly with the following command:

     ms-settings: themes 

    Press Win + R on the keyboard and type or paste the above command in the Run box. See the complete list of ms-controls settings available in Windows 10. In addition, you might be interesed in reading the complete list of all Windows keyboard shortcuts with Win keys. Windows 10 settings

  3. There you can see the button "desktop icons" on the right side. Once you click it, it will open the familiar dialog box: Windows 10 desktop icons
  4. Check the boxes below the icons you want displayed on your desktop, then click OK. Windows 10 desktop icons tick boxes

Windows 10 desktop icons enabled

Users who still prefer the classic personalization window might want to use the Custom Panel for Windows 10. This is a freeware application I created to bring the look and feel of the classic customization window in Windows 10:

personalization panel for Windows 10 v1.1-3 Read the following article :. Get classic back with Personalization Personalization Panel for Windows 10.

This is

Windows 10 build 10547 includes some menu changes Start

17.44 Add Comment
Windows 10 build 10547 includes some menu changes Start -

Windows 10 build 10547 has recently released a number of changes that you might not have noticed. Today I want to draw your attention to the Start menu changes I spotted while playing with this construction. The Start menu is the function that gets the most attention and control by users who have been disappointed by the Windows user interface 8. Let's see what they have changed.

The first change I noticed was a modified menu. If you right click on the element of the File Explorer in Windows 10 RTM, it shows the same menu as The PC folder. Almost all its elements are present. However, in Windows 10 build 10547, Microsoft changed that. Now the Explorer right-click menu files in the Start menu comes with only two elements: Pin to start and more. The rest of the elements were moved unnecessarily, in my opinion, in a sub-menu "Plus":

Windows 10 File Explorer context menu

The context menu for Windows applications was also update. When you right-click a certain universal application as photos, you will also see a new submenu "More". It is possible to access the following: "Turn live tile off," "Detach to the taskbar," "Price and review" and "Share":

Windows 10 App context menu

And, finally, in Windows 10 build 10547, the number of tiles on the Start menu has been increased from 512 to 2048 . the amount of applications in the Start menu increased from 512 to 2048. So when you open the App list, everything in there is counted. If you like 40 programs, you might have 300 "apps" or elements because it includes folders and subfolders. Thanks to our reader Jose_49 for this info.

Well, that is all that has changed in the Start menu for this construction. Let me know if you have found an interesting change I forgot to mention in this article.

Windows 10 build 10551 has an updated browser Edge

14.43 Add Comment
Windows 10 build 10551 has an updated browser Edge -

A couple of screenshots have appeared online, featuring new updates to the value Windows 10 default browser, Microsoft Edge. Let's see what we can expect in October, when the update known as "Threshold 2" gets deployed incorporating the changes after Windows 10 RTM build 10240.
microsoft edge logo banner Microsoft Edge is the new browser that Microsoft created to replace the old Internet Explorer. Microsoft Edge is designed to be faster and support all modern web standards. Microsoft has removed many of IE technology from the browser engine such as ActiveX, VBScript, etc., and also many features of the IE user interface. Edge is implemented as a universal application. Edge does not yet support extensions (add-ons).

In Windows 10 build 10551, Edge got the ability to sync bookmarks and reading list between your Windows devices. This feature will be welcomed by all users who use a Microsoft account. It is one of the features requested by insiders.

Windows 10 Build 10551 Edge sync

The second change is the possibility of opening a new browser window Edge using the button on the taskbar. The user can click the middle running instance of the browser on the taskbar to open a new window.

Microsoft Edge two instances

Unlike desktop applications, most universal applications, with the exception of some applications such as calculator and Edge can not have multiple instances running (via Ithome ).

How to find the Windows 10 build number you are running

11.42 Add Comment
How to find the Windows 10 build number you are running -

Since Microsoft changed the release model under Windows 10, users are interested in discovering who build Windows 10, they installed on their PC. As you might be knowing already, Microsoft will not release major versions of Windows but will ship more constantly updates. This recalls the many Linux distributions rolling release model. If you are part of the insider program, you must be even more aware of what you build using. Readers regularly ask me how to find Windows 10 build they are running. Today, I'll show how.

There are several ways to find the version number of the installed Windows 10 operating system.

Find the Windows build number 10 in WinVer

Press Win + R keys together on the keyboard. The Run dialog box appears. Type the following command in the Run dialog box:

 winver 

In the About Windows dialog box, you can see the build number: find windows 10 build number in winver

Finding Windows 10 build number of the console

Open a command prompt in Windows 10. It displays the build number in the first row: find windows 10 build number in cmd

You can get more detailed information on your operating system by typing the following command:

 systeminfo 

in addition to other useful information, it contains the current issue building OS: find windows 10 build number in systeminfo

You can filter the rest of the information and to see that building number using this command:

 systeminfo | findstr Building 

Find the Windows 10 issue of construction in the registry

The register contains the most comprehensive data on the release of version number and operating system. To see this, follow these steps :.

  1. Open the Registry Editor (see our detailed tutorial about the registry editor if you are not familiar with the registry)
  2. Go to the key following registry:
     HKEY_LOCAL_MACHINE  SOFTWARE  Microsoft  Windows NT  CurrentVersion 

    Tip :. See how open key desired register in one click

  3. In the right pane, you'll find everything you need to know the Windows version number 10 find windows 10 build number in Registry

There. You have finished.

Download new lock screen funds from Windows 10 build 10558

20.41 Add Comment
Download new lock screen funds from Windows 10 build 10558 -

Windows 10 build 10558 offers several new, beautiful lock screen wallpapers. As you might be knowing, Windows 10 allows the user to set a custom background for the lock screen. In Windows 10 build 10558, new images are available for use in this way.

Windows 10 build 10558 has brought new fancy icons and lots of new features, including Windows Spotlight. Spotlight window is a feature that was pre-RTM builds of Windows 10, but fell in the "RTM" build was 10240. It downloads beautiful images from the Internet and watch them on your lock screen. So every time you start Windows 10 or locked, you will see a new beautiful picture.

abc8faa5ba74a8310a0e34425dd74602

We have already displayed a huge collection of Spotlight images that were available for Windows initiated in pre-RTM builds. After you install Windows 10 build 10558, it will download several new images. These images are also very nice:

Windows 10 build 10558 spotlight lockscreens 
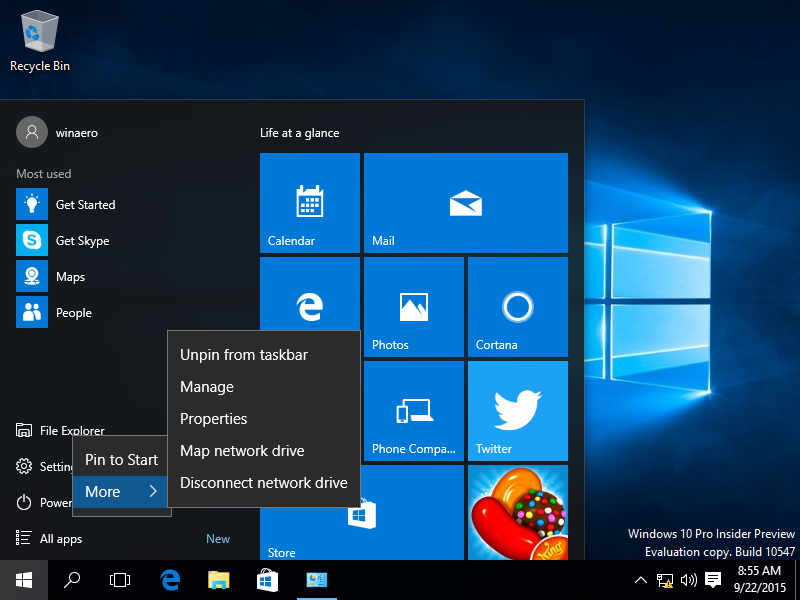
If you like these pictures, you can download them here

Download new lock screen wallpapers from Windows 10 build 10558 .

Microsoft continues to push aggressively for Windows 10

17.40 Add Comment
Microsoft continues to push aggressively for Windows 10 -

It looks like Microsoft is desperate to push Windows 10 on all devices on the market. He came to be known to those of you who have Automatic Updates enabled, the now upgrade offers directly shows them that Windows 10 is ready to install. In a way, it forces sneakily Windows 7 and Windows 8 users to install Windows 10 without the option to cancel the upgrade. Not only is it already downloaded but prompt upgrade is immediately represented without explicit user action.

Some users and Internet websites report that they are presented dialogs offer free upgrade to Windows 10, but it has no choice but to withdraw, for the reporter. Worse yet, other users found that Windows Update shows no other options other than to start the upgrade to Windows 10.

This is how it looks:
Upgrade to Windows 10 Is Ready

Windows Update Reschedule Start

Microsoft is already known to secretly downloading Windows 10 on PC users, including those who had never opted for the upgrade. Now the software giant decided to go ahead with the next level of force Upgrade .

In my view, Microsoft has gone too far. This is a bad move for users of previous versions of Windows move to Windows 10. Such behavior is unacceptable. It looks like someone at Microsoft decided that the user must carry and use but was not concerned by asking what the user wanted. They seem to have forgotten the fact that the user has a PC. Because of these made by forced day, the average user who does not know all the ways to circumvent the forced upgrade will be unable to avoid the upgrade Windows 10 and have no choice but to move to Windows 10.

As someone who has decided to stick with Windows 7 for a while, I did the following :.

  • updates uninstalled telemetry
  • Off Windows Update
  • I'm using Arch Linux as. my primary operating system, and use a " frozen " Windows 7 without updates when I really need it, for example, to Windows-only programs, which are mainly related to my work or coding for Winaero.

Disabling Windows Update is an extremely precarious solution, but better than having to deal with what updates I need help to hide, remove, twist or disable Windows 10 to avoid making forced day.

at this point, I'm glad I'm not lazy to learn Linux fundamentals and gradually move to it. I now have the choice to decide what to use and how. I think Microsoft should rethink their tactics updated and respect the preferences of the user.

Many people have experienced problems with their hardware and Windows 10, while others have software incompatibilities that are not detected by Windows 10 installer.

To escape the forced update, paste it into Notepad, save it as a batch file and run it from an elevated command prompt:

 wusa / uninstall / kb: 3068708 / quiet norestart wusa / / uninstall / kb: 3022345 / quiet / norestart wusa / uninstall / kb: 2952664 / quiet / norestart wusa / uninstall / kb: 2976978 / quiet / norestart wusa / uninstall / kb: 2977759 / quiet / norestart wusa / uninstall / kb: 3075249 / quiet / norestart wusa / uninstall / kb: 3080149 / quiet / norestart wusa / uninstall / KB :. 3035583 / quiet / norestart 

After doing this, restart your current version of Windows and hide the updates mentioned above

Note that each month, you may have to hide these updates update that is automatically displayed again. In addition, there is no guarantee that Microsoft will not issue a new update that will have the same functionality.

Updating Windows 10 Fall (Threshold 2) RTM will be built 10586

20.37 Add Comment
Updating Windows 10 Fall (Threshold 2) RTM will be built 10586 -

Microsoft signed build 10586 as the "last autumn day" for desktop users and also for mobile phones. This means that the mentioned construction will be published not only for Windows insiders, but also for Windows 10 RTM users. Phone 8.1 Windows users receive the update to Windows Mobile 10 as it is the next step for all supported devices.

Windows 10 build 10576 power menu Windows 10 Threshold 2 will be the first major update since the launch of Windows 10. It includes all published security patches and stability fixes as well as new features and options.

If you are a Windows initiated, the fall update might not surprise you much. Insiders will be familiar with the changes and new features in the next version, including applications like messaging, Skype and other interface settings.

I recommend you read the following article that mentions all the great changes and the expected features of Windows 10 update autumn (Threshold 2) RTM

of windows 10 Threshold 2 could be released on November 10

please keep in mind that Microsoft has not named the official launch date. So November 10 is just a guess. Let's wait a few days to see what Redmond has planned for the end users. (Via Neowin )

Correction Windows 10 does not save the position of the desktop icon and setting page

14.39 Add Comment
Correction Windows 10 does not save the position of the desktop icon and setting page -

Some users report a strange bug in Windows 10. The arrangement of desktop icons and their position does not remain constant between user sessions. The layout is reset each time they log on the user account. This occurs regardless of the type of account used and affects local, and Microsoft accounts.

Windows 10 desktop icons enabled To solve this inconvenience, you must follow the instructions below.

  1. Get full access to the following registry key:
    If you are using 32-bit Windows 10:

     HKEY_CLASSES_ROOT  CLSID  {42aedc87-2188-41fd-b9a3-0c966feabec1 }  InProcServer32 

    If you are using Windows 64-bit 10

    HKEY_CLASSES_ROOTWow6432NodeCLSID{42aedc87-2188-41fd-b9a3-0c966feabec1}InProcServer32

    See the following articles to learn if you do not know

    • How to take ownership of a registry key
    • How to determine if you are running Windows 32- or bits 64 bits
  2. now, open the mentioned registry keys (see How to switch to the key desired registry in one click) and set the "(default)" (unnamed) parameter to the following value:
    % SystemRoot%  system32  windows.storage.dll 

    See the following screenshot: fix Windows 10 desktop icon layout is not saving

  3. Restart Windows 10.

After doing this, your layout desktop icons do not automatically reset more. This problem can be caused by antivirus software or a security suite. In the comments, tell us what antivirus software you installed if you are experiencing this problem.

Enhancements in Microsoft Windows 10 build 10576

11.38 Add Comment
Enhancements in Microsoft Windows 10 build 10576 -

Windows Insiders who are on the fast Ring received an update. A new version of Windows 10, build 10576 has been deployed by Microsoft. If you are interested to know what changes Microsoft made, read this article
Windows 10 build 10576 Winver Here is a direct quote from the official announcement :.

cast in Microsoft Media edge :. You can now use Microsoft Edge cast video, images and audio content from your browser at any Miracast device and DLNA enabled on your network

We have some scenarios for you to try:

  • hardened a YouTube video: Go to YouTube.com in Microsoft Edge. Click the "..." in the top right menu, and select "Cast media device" and select Miracast or DLNA device you want to start with
  • Have a Facebook photo album. Connect to Facebook in Microsoft Edge and click on the first photo in one of your cast at photo albums. Click the "..." in the top right menu, and select "Media Cast in the camera" and select the Miracast or DLNA device you want to start. Browse through your photo album by clicking the backward and forward
  • Cast your music from Pandora. Log on to Pandora in Microsoft Edge to get your music and click on the "..." menu at the top right and select "Media Cast in the camera" and select the Miracast or DLNA device you want to start

please note :. casting protected content (content in places like Netflix and Hulu) is not. supported

Ask Cortana inside PDF files in Microsoft board: You can now select text while reading a PDF file in Microsoft Edge and click- right on "Ask Cortana" to find additional information.

Xbox app beta update for Windows 10: beta Xbox app for Windows 10 was updated last Friday which includes the ability to easily find and add Facebook friends are also on the Xbox live play, discuss and share clips - a top requested feature. In addition to this new feature, the voice-recording feature was added to the DVR set and store in the beta version of the application will allow Xbox to search and buy Xbox One games - including games with gold and special offers with gold promotions and Xbox One 25-digit codes will be redeemable within the application. For more information on this update -. View this post on Xbox son

Windows supported Miracast since Windows 8.1 and Connect palette in Windows 10 ( Win + K ) already supporting cast without thread.

'Cast media device "functionality was there earlier Insider builds of Windows 10, but now appears to be ready to be announced officially. Trick:. Shortcuts Windows key (Win) All Windows users should know 10

There. It is quite possible that the building contains a number of hidden secrets under the hood changes. We will update you as long as we are able to discover new features in Windows 10 build 10576. Stay tuned.

Windows 10 will become a recommended update

17.36 Add Comment
Windows 10 will become a recommended update -

If you are not impressed with Windows 10 and decided not to move it, you've probably been able to the avoid and free upgrade offer. But soon Microsoft is taking another step to coax Windows to users 10. The update that allows the upgrade to Windows 10 will become a recommended update. Recommended updates are automatically installed if your Windows Update settings are configured to do so.
Windows 10 banner logo devs 01 Microsoft's goal is a billion devices running Windows 10 in the next 2 years. As Windows 10 can be used on phones and tablets too, not just the PC and is given away as a free update for Windows 7 and 8 PC users, this billion "devices" figure seems quite real and achievable if you let Microsoft upgrade your device easily to the new operating system. In the PC industry, the growth of the new operating system has slowed dramatically that many users find Windows 7 has more features and more customization in addition to being more usable, more beautiful, faster and backwards compatible.

Windows 10 is still growing, even if slowly, because users interested in level regularly built new operating system. Users who like to follow the new operating system via Insider Preview builds.

Windows 10 build 10586 Many users who have accepted the upgrade are amateurs who are interested in trying the latest OS from Microsoft.

Many users who are already in Windows 10 are the players. They upgraded because Windows 10 supports DirectX 12 3D games, and because the store has a lot of free casual games too. According to statistics published by the platform of popular Steam game, each fourth Steam user has switched to Windows 10.

Store blue splash screen The PC average user is a person who accepts everything he sees on the screen, especially if it is advertised as a free update. The average user feels no difference between a UAC prompt and offer upgrade prompt. These people can install Windows 10 and will not be able to go back to previous versions of Windows, since they do not know how.

Moreover, the majority of users seem to be satisfied with their current version of Windows. Windows 7 is the most popular operating system for now. It replaced Windows XP after a long struggle. Windows 7 will be supported for many years, and has beautiful features, a lot of customization, a nice interface, speed, ease of use and compatibility. So most users do not see any reason to move.

Soon, Microsoft will push Windows 10 to everyone as a recommended update. Many users have enabled recommended updates to be installed automatically. This means that Windows 10 will come to their PC silently and automatically. This has happened in the near past and many users were not happy to have 3 GB of Windows 10 installation files automatically downloaded without their consent and without any warning.

The good thing is that Windows 10 Setup is won 't be automatic. Will require a sort of explicit user confirmation.

What is bad but once it arrives as a recommended update, huge files can be downloaded in silence. This can affect many users who use a limited data plan for Internet.

Microsoft allows users to 31 days to return to the previous version of Windows after upgrading to Windows 10. To avoid Windows 10 and continue using Windows 8.1 / 8 or Windows 7, is a good idea to disable recommended updates in Windows update settings. Personally, I completely disabled Windows Update. I use Windows very rarely and for a limited number of tasks. Because I am not happy with the new versions of Windows XP after I switched to Linux and have been very happy since.

Search Fix app does not work in PC Settings in Windows 10

14.35 Add Comment
Search Fix app does not work in PC Settings in Windows 10 -

Several Windows 10 users face this unexpected behavior of Windows 10 is that when searching from the Start menu or in the Settings app, the search returns no results. If you face this problem, follow the instructions below to resolve this issue.

Windows 10 search does not work
To secure research in the application settings and Start menu in Windows 10, you must do the following:

  1. Press Win + R shortcut keys together on the keyboard to open the Run dialog box
    Tip :. see Windows shortcuts (key Win) every Windows user should know 10
  2. Paste the following text in the Run box and press Enter :.
    % LocalAppData%  Packages  windows.immersivecontrolpanel_cw5n1h2txyewy  LocalState 

    Windows 10 run dialog

  3. A new Explorer window will open. You will see Indexed folder . Windows 10 indexed folder
  4. Right click and open its properties. Windows 10 indexed folder properties
  5. In Properties, click the Advanced button on the General tab. The following dialog box appears: Windows 10 indexed folder properties advanced
  6. Here, check the option labeled "Allow files in that folder have contents indexed in addition to file properties", as shown below:
    Windows 10 fix search does not work in Settings
    If it is already checked, uncheck it, click Apply and check again, and click Apply again. Finally, click OK and close any dialog windows.

You're done. Wait a few minutes until the Indexing Service checks all files in the folder. After that, research in the Settings application and in the Start menu should start working again.

Where Lockscreen Spotlight images in Windows 10?

11.34 Add Comment
Where Lockscreen Spotlight images in Windows 10? -

Windows Spotlight is a fancy functionality that exists in Windows Update 10 November 1511. It downloads beautiful images from the Internet and watch them on your lock screen! So every time you start Windows 10 or locked, you will see a new beautiful picture. However, Microsoft has uploaded images hidden to the end user. Here's how you can find these images and use them as wallpaper or elsewhere.

Windows 10 build 10558 spotlight lockscreens
to access the image files downloaded by Windows Spotlight feature, follow the instructions below.

  1. Press Win + R shortcut keys together on the keyboard to open the Run dialog box. Tip: See the complete list of Win keyboard shortcuts in Windows
  2. Enter the following in the Run box .:
    %localappdata%PackagesMicrosoft.Windows.ContentDeliveryManager_cw5n1h2txyewyLocalStateAssets

    Windows 10 Run open spotlight folder
    Press Enter

  3. A file will be opened in the File Explorer.
    Windows 10 Run spotlight folder
  4. Copy all the files you see in a folder you want. This PC Pictures is suitable. Windows 10 this pc pictures
  5. Rename each file that you copied to add an extension ".jpg". You can do this either by selecting each file, and press F2 and rename Tab quickly files.Or even faster way would be to open a command prompt in the selected folder and type this command :.
     Ren * * * .jpg 

    Windows 10 batch rename files

You finished:
Windows 10 find spotlight images

You can download vast collection 'Spotlight images from here:

  • Download new lock screen funds from Windows 10 version in 1511
  • Download Windows 10 pictures lockscreen from Windows 10 RTM

Windows 10 default lockscreens There. Now you can use these images as any other picture - set as wallpaper, view Windows Photo Viewer and so on. (By the way, here's how you can enable Windows Photo Viewer in Windows 10).

How to make Windows 10 ask the user name and password when connecting

20.33 Add Comment
How to make Windows 10 ask the user name and password when connecting -

When Windows 10 starts, it shows you a login screen prompting you to enter a password. If you have more than one user in your operating system account you will be able to click on the account user the image you want, then enter the account password. Instead, you can make Windows 10 asks you to type the user name too, and the password to the login screen. It is a good measure of security and privacy. Here is how this can be done

To make Windows 10 ask the user name and password on the login screen , you have to do following:.

  1. Press Win + R shortcut keys together on the keyboard to open the Run dialog box. Type the following command in the Run dialog box:
     secpol.msc 

    Tip :. Shortcuts Windows key (Win) All Windows users should know 10

  2. Local Security Policy will be opened. There, go to the following address:
     Local  Security Options 
  3. Scroll to the option called Interactive logon: Do not display last user name . Set it to Enabled as shown below :. Windows 10 dont display last user name
  4. Click Apply and OK and sign in using your Start menu

before: Windows 10 login screen

After Windows 10 login screen without username to instead of the name of the user account specified with an image tile, the login screen now displays the text "other user" and two text fields, where you can type your user name and password, if was created. Now you'll be able to connect even in hidden accounts.

If your edition of Windows 10 comes without the tool Local Security Policy (Home editions do not have it), then you can make the same change with a simple registry tweak as

  1. Open the Registry editor
  2. Navigate to the following registry key :.
     HKEY_LOCAL_MACHINE  SOFTWARE  Microsoft  Windows  CurrentVersion  Policies  System 

    Tip :. See how to move to the desired registry key with one click

  3. Edit 32-bit DWORD value named DontDisplayLastUserName and set its value data to 1, as shown below: Windows 10 dont display last user name Registry
  4. Restart your computer for the setting to take effect

to cancel this setting, set the value data "DontDisplayLastUserName" 0 or toggle the "interactive logon. : do not display "option to return the" last name disabled user. "

The same can be done using Winaero Tweaker . Go to startup and logon -> Hide User Name :.
Winaero Tweaker hide last user name
Use this option to avoid modifying the registry

Also, I prepared loan registry files for use, which you can download here:

download registry files

just open the registry files for the changes they

This is

Download MUI language packs for Windows 10 build 11082

17.32 Add Comment
Download MUI language packs for Windows 10 build 11082 -

Microsoft released a new version of Windows 10. Windows insiders who are on the fast Ring becoming Windows 10 build 11082. Here it a set of direct links to Mui files (x86 and x64) for the recently released Windows 10 build 11082.

Warning! At the time of this writing, there is a bug in Windows 10 build 11082, which prevents you from installing MUI language packs and also .NET Framework 3.5. So if you download a language pack and want to install it, you have to wait a patch for Windows 10 build 11082. Microsoft should release soon.

mui langpack globe logo banner

Language / Locale direct download link

Windows 10 x86 build 11082 MIU / LPs

ar-sa Download
cs-cz Download
de-of Download
en-gb Download
en-US Download
es-es Download
es-mx Download
fi-fi Download
en-us Download
en-US Download
it-it Download
ja-jp Download
ko-kr Download
nl-nl Download
pl- pl Download
pt-br Download
ru-ru Download
sv-se Download
th-th Download
tr-tr Download
zh-cn Download
zh-tw Download

Windows 10 x64 build 11082 MIU / LPs

ar- his Download
cs-cz Download
de-of Download
en-gb Download
en-US Download
es-es Download
es-mx Download
fi-fi Download
en-us Download
en-US Download
it -it Download
ja-jp Download
ko-kr Download
nl-nl Download
pl-pl Download
pt-br Download
ru-ru Download
sv-se Download
ee Download
tr -tr Download
zh-cn Download
zh-tw Download

have a question? See how to install a language MUI CAB file in Windows 10 or leave a comment.

Change default download folder in Microsoft board (without mobile downloads)

14.31 Add Comment
Change default download folder in Microsoft board (without mobile downloads) -

Even if you use the latest version of Windows 10 build, you will find that Microsoft Edge has no option to set the default folder where the downloaded files will be stored. It uses the Downloads folder of the user. Although you can move the file downloads is to set the new path as the default location for Edge, it is not an ideal solution. In this article we will see how to define the default location for downloads of the Microsoft board without moving the Downloads folder. So it will be set separately for Microsoft Edge browser, which can be useful if you use different browsers simultaneously.
If you use Windows 10 build 14316 or above, you can avoid modifying the registry. In Windows 10 Anniversary Update Microsoft added a native option to set the default download folder only for Microsoft Edge. See this article:

Change the default downloads location value in Edge with Anniversary Update

To change default download folder only Microsoft board , you must apply a simple registry tweak

    1. Close Microsoft board
    2. editor of Open registry
    3. Go to the key following registry: ...
       HKEY_CURRENT_USER  SOFTWARE  Classes  local SettingsSoftwareMicrosoftWindowsCurrentVersionAppContainerStoragemicrosoft.microsoftedge_8wekyb3d8bbweMicrosoftEdgeMain

      Tip :. See how to move to the desired Registry key in one click

    4. here Create a new string value and name it Default Download Directory. Set its value data to the full path of the desired folder you want to be used by the Edge browser as the default download location. In the screenshot below, I'm using C: Downloads edge that the new path:
      set edge download location

Now open edge, click icon "Hub" (the first icon after the address bar) and switch to the Downloads pane. Edge downloads hub When you click on the "Open Folder" folder that you set in the register will be opened. Edge open downloads folder From now on, this place will be used by default to store downloaded files in Microsoft Edge. Here.

Enable verbose logging messages in Windows 10

20.29 Add Comment
Enable verbose logging messages in Windows 10 -

It is possible to enable detailed information to Windows 10 login, logout, restart, and the events of stop. The operating system will report exactly what is happening at present in progress while you are on the opening / closing screen. In this article we will see how it can be activated. This trick also works in Windows 8 / 8.1, Windows 7, Windows Vista and Windows XP.

To enable verbose log messages in Windows 10 , you must apply a simple registry tweak. If you prefer to avoid publishing record, here are the files ready to use registry:

Download the registry files to enable detailed logging of messages

Unpack ZIP file you downloaded and double click the file named "logon.reg enable verbose". You will need to restart the operating system to enable the changes. The cancellation tweak is also included

  1. To do this manually, open registry editor
  2. Go to the following registry path: ..
     HKEY_LOCAL_MACHINE  Software  Microsoft  Windows  CurrentVersion  Policies  System 

    Tip: .. See how to switch to the desired registry key with one click
    If you do not have such a key, then just create

  3. Create a new 32-bit DWORD value named VerboseStatus . Set its value data to 1. If using 64-bit Windows 10, you still need to create a 32-bit DWORD value. See the following screenshot: Windows 10 enable verbose logon status

Now, try logging out of your user account or to restart the operating system. You will see verbose log messages in action

Windows 10 verbose status enabled

The same can be done using Winaero Tweaker :.

verbose

It comes with the option "enable or disable verbose messages for sign-in condition" which can help you avoid modifying the registry and enable / disable this feature with one click.

Display of verbose status messages is one of my favorite settings because it is very helpful when troubleshooting startup, shutdown, logon, logoff or slow behavior.

There.

How to switch from IDE AHCI in Windows 10

17.28 Add Comment
How to switch from IDE AHCI in Windows 10 -

If you installed Windows 10 with the disk controller set IDE mode in the BIOS, you can not go directly to AHCI and hope that Windows will function properly. Once you change the BIOS, Windows 10 does not boot. To avoid this, you must follow the instructions in this article.

This operation is very simple and does not require editing the registry or other complex tasks. You must do the following

  1. Add "Windows 10 safe mode" boot loader as described in the following articles :.
    • How to add safe mode in the start menu in Windows 10 and Windows 8.
    • Start Windows 10 in Safe Mode

    windows 10 safe mode boot menu options

  2. once you have done this, restart your PC and see if the Safe the element mode works as expected by actually starting again in Safe Mode
  3. now, reboot and press any is the key to your PC needs to enter the BIOS -. F2 F10 Del or whatever - it will be mentioned somewhere. Change the mode of IDE to AHCI disk controller.
  4. Save the BIOS settings and start Windows 10 in Safe Mode.
  5. After Windows 10 starts in Safe Mode, restart it and start as usual. It should start without any problems in AHCI mode. after

If this does not work, you can switch the controller to IDE mode and apply a registry tweak mentioned in the "Switch IDE AHCI after installing Windows 7 or Windows 8 "article.
There.

How to delete the Run History in Windows 10

11.30 Add Comment
How to delete the Run History in Windows 10 -

In Windows 10, Microsoft implemented a new Start menu and a new user interface parameters instead of just continuing and improving on it they had. It is based on the new platform App World and has nothing common with the old Start menu or Windows Explorer Shell 7. Because of this change, they reimplemented the parameter for controlling the document history / jumplists but problem is that this new option does not disappear Run dialog history! There are now more no option in the settings of the operating system to clear Run dialog history. Let's see how to delete the run history in Windows 10.

This is how the story looks Run dialog on my PC:

Windows 10 run history
in Windows 7, Windows 8 and earlier versions of Windows, you can remove it using the Taskbar Properties dialog box as described in the following article: How to clean the history of the Run command in Windows 8.1 and Windows 7. in summary, when jumplists / document history has been turned off in these systems, the Run history would also be cleared.

But in Windows 10, even if you disable the setting "Show recently opened in Jump Lists elements Start or the taskbar" from the Settings app, it does not remove the history Run dialogue. There is no way to clear the Run history, except by manually editing the registry. to clear run history in Windows 10 , you must do the following

  • Open the Registry Editor
  • Go to the following path :.
     HKEY_CURRENT_USER  Software  Microsoft  Windows  CurrentVersion  Explorer  RunMRU 

    Tip: . you can access the required registry keys with one click

  • Delete all the values ​​you see on the right side: Windows 10 delete run history

Here you just erased! Run history in Windows 10. Windows 10 empty run history

quite possible that Microsoft will add an option to the Settings app. But at the time of this writing, the latest version of Windows 10 build 10586 offers nothing for the task.

How tooltips most useful shortcut in Windows 10

14.27 Add Comment
How tooltips most useful shortcut in Windows 10 -

file shortcuts have been in Windows since Windows 95. A shortcut is simply a link to another file or a folder on the system files from your hard disk or system object. The object they contain a link to is called the target. Shortcut files can be placed anywhere - on your desktop, in the Start menu or pinned to your taskbar. When you hover over a shortcut with the mouse, a tooltip appears. Today we will see how useful these tootlips and display more details about shortcuts instead of just the shortcut comment.


When you hover over a shortcut, you get a tooltip (also known as a tooltip) showing the comment property.

Windows 10 default shortcut tooltip

comments and related properties are typically stored on the file system or inside the shortcut file.

shortcut files have the extension .LNK, but it is still hidden by the file explorer. Shortcuts store information such as the target command line hotkey shortcut, the target type, icon, information on whether to run the shortcut as administrator and other information. All this information very useful.
In addition to these classic details, from Windows Vista, the Explorer application can read metadata values ​​for files and folders. The update Explorer application can display this additional information from a very long list of properties described on MSDN.
These metadata properties can be displayed, for example, in the Details pane of the Explorer. Let's see how to show some of the most helpful applicable shortcuts via their tooltips.

This can be done with a simple registry tweak.

  1. Open Registry Editor.
  2. Navigate to the following registry key:
     HKEY_CLASSES_ROOT  .lnk  ShellEx  {00021500-0000-0000-C000-000000000046} 

    Tip: Learn how to pass the key desired register with one click.

  3. Right-click the key called {} 00021500-0000-0000-C000-000000000046 and export it as a file for backup purposes. Windows 10 export registry key Windows 10 export registry key name Then, right click again and remove this {00021500-0000-0000-C000-000000000046} subkey. Windows 10 delete registry key
  4. Next go to the following registry path:
     HKEY_CLASSES_ROOT  lnkfile 
  5. here Create a new value chain and name InfoTip . Set its value data to the next value (you can copy it and paste it into the data of the value of PreviewDetails):
     prop: System.Comment; System.Link.TargetParsingPath; System.ItemFolderPathDisplay 

    See the text following screenshot: Windows 10 shortcut create infotip

now hover over a shortcut. The result will be as follows :. Windows 10 custom shortcut tooltip

Using this simple trick you can tooltips really useful shortcut in Windows 10. In addition to the commentary, it will also show the shortcut target path and the shortcut location

to save time, I prepare files ready to use registry:

Download the registry files

Double click the "activate tooltip.reg custom shortcut "file to enable these extended tooltips. The undo file is included

I recommend you read our previous article on this tip :. How to find the details for shortcuts in Windows 8.1, Windows 8 and Windows 7. It has more technical details of how this tweak works.

There.