Disable slam in Windows 10, but keep other extended window management options

17.05 Add Comment
Disable slam in Windows 10, but keep other extended window management options -

Aero Snap feature, which appeared in Windows 7, allows you to easily manage open windows. It has a number of functions, one of which is the ability to anchor a window to the edges of the screen. This behavior exists in Windows 10 and Windows 8 as well. Windows disables Aero Snap completely via Accessibility Centre but offers no control over it. Turn off Aero Snap disables drag-to-top to maximize, drag-de-maximize restore, snap and function of the vertical maximization slide side edges to-- it's all or nothing switch. You can keep all the Aero Snap options but only disable drag-to-side edges to snap. In this article we will see how it can be done

Option One :. Use a registry tweak
To keep other behaviors Aero Snap on only disable the snap happens when you drag a window to the left or right edge of the screen, follow the instructions listed -Dessous:

  1. Open the Registry editor
  2. Navigate to the following registry key :.
     HKEY_CURRENT_USER  Control Panel  Desktop 

    Tip :. You can access a key desired with one click recording

  3. Change the string value named DockMoving . By default, it has value of 1. You need data to 0, as shown below: Windows 10 disable snap only
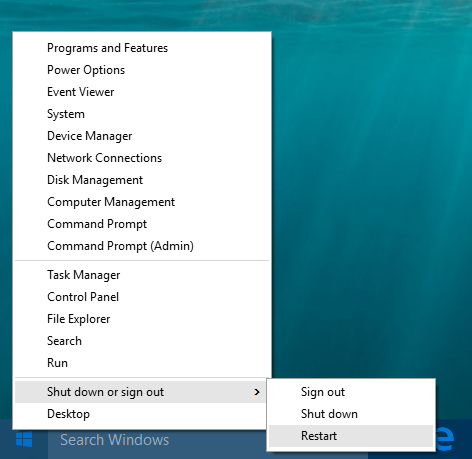
  4. Log on to Windows 10 from your account and sign in the back for that the changes take effect. Explorer restart is not enough

Option two :. Use Winaero Tweaker
With Winaero Tweaker 0.3.2.2, you can quickly customize the snap behavior without changing the registry manually. Check the "Disable snapping only" option on the known behavior - Disable Aero Snap. Winaero Tweaker disable snapping only

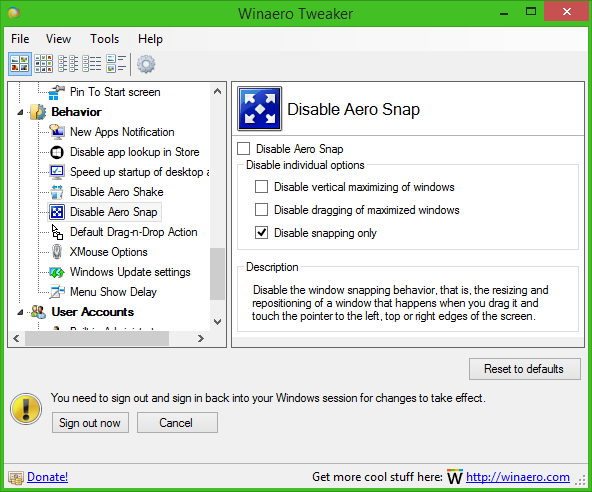
This change will be applied instantly. No restart is required.

Fixed critical error Start Menu and Cortana will not run under Windows 10

14.04 Add Comment
Fixed critical error Start Menu and Cortana will not run under Windows 10 -

After upgrading to Windows 10, many users see an error message: Critical error - Start Menu and Cortana are not works. For some reason, most people affected by this error are those who upgraded from Windows 8.1. Here's what you can do to get rid of this error message.

It is not known what exactly causes this and why it affects users who upgraded from Windows 8.1 more. To resolve the message Critical error and Cortana Start Menu do not work , you can try the following.

Try restarting your PC
Try restarting your PC. Once you are connected, press Win + X shortcut keys on the keyboard. In the Power User menu, click the Restart option. See the following article for details: All means to restart and stop the Windows 10.

Windows 10 win x restart Many users have reported that it works

Try booting into safe mode.
restart in safe mode and reboot back to normal mode. See these articles :.

  • How to start Windows 10 in Safe Mode
  • how to add safe mode in the start menu in Windows 10 and Windows 8.

windows 10 safe mode boot menu options
Some users reported that it helped, but the problem can return. So, this solution may not be permanent.

Try to disable or uninstall your antivirus software
If anything above helped you, try to disable or even uninstall your antivirus software. This can be done from the Control Panel -> Programs and Features -> Uninstall a program. software installer uninstall

This may be a workaround, because your antivirus software may have been installed under the previous version of Windows and can operate incorrectly under Windows 10. Although the upgrade to Windows 10 detects these problems during installation, re-Installation allows the application to define its parameters in the right way.

Add a new local user account with administrator rights
Try adding a new local administrator account. Log on to the new account, log out of it and then log in to your user account. Some users report that this solved their problem. If the Start menu works in the new account is created, but does not work in your account, you can switch to the new account for daily use.

administrator logon screen There. Please share the method worked for you. If you have found a more reliable and reproducible solution, post in the comments.

Microsoft pushed out of Windows 10 build 10586 to slow

11.03 Add Comment
Microsoft pushed out of Windows 10 build 10586 to slow - Ring

Today, we came to know that Microsoft released Windows 10 build 10586, which is known as the November 2015 update / Threshold 2 to RTM Windows initiates the slow device. It should be available through Windows Update. The official pictures of the ISO will soon be available as well.

Last week, everyone who was on the fast Ring Windows Insiders program the new Windows build 10586 10. Now the same building reached Insiders Ring slow.

Windows 10 build 10586 Windows 10 build 10586 is notable for the watermark on the desktop. This indicates that this could be the final version update the threshold 2.

Several sources said November 10th could be the official release date of the threshold 2 for the general public who upgraded to Windows 10.

official records to build ISO 10586 are not yet available. Microsoft is expected to release in " days " (via Neowin ).

Tip: Turn over tiles in Windows 10 Start menu

20.02 Add Comment
Tip: Turn over tiles in Windows 10 Start menu -

If you are happy with the default Windows Start menu 10 and do not use a third alternative Start menu as Classic Shell you might find this useful tip. In this article we will see how the Windows Start menu by default show 10 more tiles.

If you're new to Windows 10, you know maybe not all the capabilities of the new OS, especially the new options added by the update TH2 (1511 Version ). One of the new options allows you to have more tiles on the Start menu. To enable this option, do the following:

  1. Open the application settings
  2. Back to customization -> Start
  3. There, enable ". . show more tiles ": windows 10 enable more tiles in the start menu

in my case, the Start menu started showing 4 columns of tiles. Previously, he showed groups of 3 columns. See screenshots below

Before :.
windows 10 before enable more tiles in the start menu
After
windows 10 after enable more tiles in the start menu
You're done. This does not require additional measures as you restart or log out. The changes will be effective immediately. You may recall that Windows 8.1 also has a similar option for the startup screen.

There.

Windows 10 Version 1511 removes applications you update builds

17.01 Add Comment
Windows 10 Version 1511 removes applications you update builds -

He came to be known that when you upgrade Windows 10 to a new generation as TH2 (v 1511), it removes silently applications that are incompatible with the new construction. The operating system does not warn the user, it removes applications secretly. It is impossible to know exactly what applications will be removed in advance.
Windows 10 build 10586 I saw the first mention of such hostile behavior of one of our readers, "xtcrefugee" which warned that windows in October 1511 will remove windows 7 games windows 10 automatically.

However, this behavior is not limited to games. users ATI / AMD have suffered too by removing the Catalyst driver software. Catalyst is a control panel software for the video driver. For some reason, the operating system uninstalls if you upgrade Windows 10 Windows 10 RTM version 1511. Another application that the threshold 2 Upgrade "dislike" is the information tool called Software Speccy . On one of my PC, uninstall the drivers ASUS SmartGesture I had installed and ASUS SmartGesture software too that I had configured to disable certain gestures, and replaces it with Windows Update drivers actions reactivated these gestures touchpad accident-prone. Other applications that are allegedly uninstalled for some users * are CPU-Z, CPUID, CCleaner, SmartFTP, Avira Antivir Security, Novell client, Cisco VPN client, NETGEAR Genie AntiVirus and ESET. It may be that some of these applications may be incompatible, especially if you have an older version of the installed application. However, it is the responsibility of Microsoft to inform the user on which the application will be deleted after such a system upgrade for new construction.

It seems that Windows 10 Version 1511 is to uninstall most of these applications that work directly with equipment or perform an update drivers.

This is a very unexpected and unpleasant behavior. The worst thing is that you can not even guess exactly what will be deleted. The operating system does not provide a warning or information for the user. Thus, it can remove even some paid app that you bought earlier to use with your Windows version before upgrading.

It is not known if this is a deliberate step taken by Microsoft where incompatible applications are silently deleted or whether it is a bug in the installer. But it is certainly a good idea to create a backup of your applications and their licenses to avoid problems if you decide to upgrade from Windows 10 to latest builds. This might even be the reason that caused Microsoft to remove ISO images for Windows 10 1511 from public servers before finally restored. Tell us if you have suffered the loss of any application of this upgrade already and how you dealt with it.

A spokesman for Microsoft said that this is part of the agreement of services and therefore should be set by the user. They cite "The Microsoft Services Agreement allows Microsoft to modify or discontinue certain apps or content that we deem your security is in danger." By using "security" as the reason, Microsoft may delete a feature in Windows it -even or any application they feel puts you at risk. There is little or no company transparency.

Fix Disk Cleanup is missing from the Properties drive in Windows 10

14.00 Add Comment
Fix Disk Cleanup is missing from the Properties drive in Windows 10 -

If you open the Disk Properties dialog box in Windows 10, you may find the button "Cleaning disc "is missing on the general tab. In this article I will explain why he disappeared and how to restore it to where it was originally.

You might be surprised to know that the button's visibility "Disk Cleanup" depends on the Recycle Bin settings! If you disable the Recycle Bin, which is, if you configure Windows so that files deleted bypassing the Recycle Bin and directly get deleted, then click the "Disk Cleanup" button disappears Drive Properties. This does not make sense because the Disk Cleanup utility includes many other options to clean the drive out files from the Recycle Bin. Which developer at Microsoft implemented this bizarre behavior and why remains a mystery to me. I think it is completely unnecessary.

To make the new visible in Disk Cleanup button in the Properties dialog box of the player in Windows 10, right-click the Recycle Bin icon on your desktop. In its properties, you must enable the "Custom size:" ..

This is how things look when it is set on the option that says "Do not move files to the Recycle Bin Delete Files immediately after being removed. "

Windows 10 disk cleanup button is missing once you activate the" custom size "option and click the" Apply "button, the missing button disk Cleanup reappears like magic

Windows 10 disk cleanup button is enabled

There. Remember, regardless of the visibility of this button, you can still run disk cleanup using cleanmgr control . Read the article below to understand how in Windows 10 in particular, this order is usually necessary to free up disk space after each update of Windows 10 build: delete the Windows.old folder in Windows 10.

Windows 10: changes coming with the update Redstone

22.59 Add Comment
Windows 10: changes coming with the update Redstone -

Monitoring on Windows Update on November 10th / 1511 version of the next major upgrade - code named Redstone - is expected some time next year for all Windows 10 users. It is already in development. Here are the changes you can expect in the Redstone update.

title bars For many users, the only value features in Windows version in October 1511 are colorful and the ability to use Windows 8 / Windows 7 product key for activation directly . The rest of the features are usually all subway next time that many users choose to avoid completely. Redstone should extend Cortana into a wizard of the entire system.

Windows 10 login screen The update Redstone will also feature some additions to the Notification Center / Action Centre. In addition to showing the notifications, it can support widgets, providing quick snapshots of data synchronized on your Windows 10 machines.

cortana icon The big improvement is rumored to be using Cortana extended to you as a user. Rumor has it that Cortana will be able to track user activity when navigating around the OS, and the surface useful information based on what users are displayed on the screen. I wonder if this could be similar to the Office assistant that you had in earlier versions of Office. There also appears to be inspired by the function Now On Tap Android Marshmellow that works the same way.

The app Uber cab on Windows 10 was recently updated to book a taxi using Cortana. Cortana widgets or features may allow you to do such tasks Google Android now allows using cards.

Microsoft is also believed to be looking for greater integration between Office 365 and Windows 10.

Microsoft Office icon Another interesting feature is Continuation of tasks that will allow users to start a task on one device and resume and finish on another. This is clearly inspired by the continuity of Apple and Handoff features already present in OS X. However, all these rumors. The RTM version of the update Redstone can not include them. Some of them can even be postponed for the update after Redstone.

Skydrive Sync Recently, Cortana got the ability to synchronize your laptop with your interests, preferences weather and more between your PC and the Cortana app on iOS or Android. Cortana also allows PC owners to send and receive text messages (SMS) from their desktop OS that is ultimately routed through the Cortana app on Windows and Android phones. Call notifications from your phone may also appear in the notification center on Windows 10 to Redstone.

Clearly, these new features will gradually be introduced in the coming Insider built for Windows 10. Users who are still part of the initiated program giving feedback to Microsoft should start getting new construction throughout next year.

Overall, these features all seem to be Microsoft moves to catch up with Apple and Google do with iOS / OS X and Android. They are not particularly revolutionary, unless you're excited about Windows turn into a mobile operating system and landing or leveling down more desktop functionality.

How to disable the automatic update applications in Windows 10

19.58 Add Comment
How to disable the automatic update applications in Windows 10 -

If you use Universal (Metro) applications in Windows 10, you may have noticed that as updates system, these applications also automatically get updated. New versions of applications are usually larger. They installed without your consent and this not only causes additional traffic and reduces disk space, but some applications may have regressions, the design changed or missing features in the new version. So you might not want to update all your apps automatically and prefer rather to update them manually. Here's how to disable automatic updating of applications in Windows 10.

to disable automatic updates of applications under Windows 10 , do the following:

  1. Open the app store.
  2. In the upper right corner, you should see a picture of your Microsoft account (or a white / gray box). Click it and choose the item settings in the dropdown menu.
  3. You will see the switch "Update applications automatically." Set it off and you're done: Windows 10 disable automatic apps updates

As you can see, it is very easy to disable automatic updating of applications in Windows 10. You can activate at any time or always update your applications manually using the application store. Fortunately, you still have control over the update process applications in Windows 10, unlike the system updates and drivers that are forced on users.

There.

Command prompt in Windows 10 can be closed with Alt + F4

16.57 Add Comment
Command prompt in Windows 10 can be closed with Alt + F4 -

Many users know that in Windows 10, Microsoft's latest operating system, the command prompt got updated. The command prompt window in Windows 10 supports the free resizing and copy and paste using familiar keyboard shortcuts like Ctrl + C / V . But do you know that you can finally close the command prompt window using Alt + F4 , like any regular window? In this article, we will examine this behavior and see a way to disable it.

Windows 10 is the first operating system that Microsoft has helped close the command prompt window using the common shortcut Alt + F4 . In all previous versions of Windows such as Windows XP, Windows Vista, Windows 7 or Windows 8, you had to type "exit" to close the command prompt or click on the "X" button with the mouse or touch.

This improvement is really nice. There is no reason for anyone disabling this feature. However, if you really need to disable the ability of the command prompt to be closed with Alt + F4 , Microsoft provides a registry tweak.

This is how it can be done

  1. Close all open instances rapid control
  2. Open the Registry Editor
  3. Go to the following path: .. .
     HKEY_CURRENT_USER  Console 

    Tip :. See how to move to the desired Registry key in one click

  4. Create a new 32-bit DWORD value named AllowAltF4Close . Note: If using 64-bit Windows 10, you still need to create a 32-bit DWORD value. Set its value data to 0. Windows 10 disable Alt F4 command prompt

Now, if you open a command prompt, it will not be possible to close it using the Alt + F4 hotkey

Note :. In the command prompt options, it is possible to activate the "legacy" mode of the console: Windows 10 legacy console

When enabled, it disables the free resizing function and Ctrl + C V Alt + F4 keyboard shortcuts at once. Using the described tweak, you'll be able to disable Alt + F4 separately, but keep all other occupations.

As I said earlier, there is really no reason to disable this additional functionality. It is incredibly useful. The purpose of this article was to make you aware that you can finally close the command prompt using Alt + F4 and show you a way to control this behavior.

There.

How to change the row height menu in Windows 10, Windows 8.1 and Windows 8

22.55 Add Comment
How to change the row height menu in Windows 10, Windows 8.1 and Windows 8 -

Earlier versions of Windows such as Windows Vista or Windows 7 settings were very flexible appearance. Unlike the newer versions, including Windows 10 and Windows 8, they allowed to change spacing between desktop icons size of the window border, scrollbar width and many other options that you can not change. One such option is the height of the bar menu for applications that have a menu bar. Increasing the height of the menu bar can be very useful if you use a touch screen device. Taller menus are much easier to operate with your finger. It is a registry tweak that can serve as a workaround for this case.

Although the user interface to change the appearance Advanced in Windows 10 and Windows 8 has been removed by Microsoft, you have at least two ways to grant such parameters.
To change menu line height of 10, Windows 8.1 and Windows 8 , do the following.

  1. open the registry editor.
  2. Go to the following registry path:
     HKEY_CURRENT_USER  Control Panel  Desktop  WindowMetrics 

    Tip :. See how to move to the desired Registry key in one click

  3. You will see a string value (REG_SZ) named menuHeight . As the name suggests, this value is responsible for the height line menu. Its value data uses the following formula:
     -15 * height in pixels menu 

    For example, by default, it is -285, meaning 19 pixels (px):

     * 19 = -15 -285 

    Windows 10 menu height registry
    If you want to increase simply calculate a new value. For example, to put 100 px, you must define the menuHeight value data as follows:

     -15 * 100 = -1500 

    Windows 10 menu height registry 1500

  4. Now , log out of your user account and log in back. Run Notepad and look at the level of
    menu bar before :. Windows 10 default menu height After Windows 10 tweaked menu height

There. To undo this change, all you need to do is set the parameter to -285 menuHeight and finished.

Alternatively you can use Winaero Tweaker to change the line up menu. In Windows 8 and Windows 8.1, it will be applied on the fly. In Windows 10, you still require to log out and log in back.

menus Winaero Tweaker In addition, it allows you to change the menu font, which can only be changed with a registry tweak, because it is represented in the registry in binary format.

Note that some desktop applications have a menu bar does not respect this setting to all.

MUI Language Pack for Windows 10 build 11099 - Direct download links

19.54 Add Comment
MUI Language Pack for Windows 10 build 11099 - Direct download links -

Microsoft released a new version of Windows 10. Windows insiders who are on the fast Ring get from Windows 10 build 11099. Here are a set of direct links to Mui files (x86 and x64) for the recently released Windows 10 build 11099.

mui langpack globe logo banner
download MUI language packs is useful for users who need to install on multiple computers. They save their Internet bandwidth and time by not download them again on each PC. Instead, they can save the offline package and use it for future installs.

Language / Locale Direct download link

Windows 10 x86 build 11099 MUI / LPs

ar-sa download link
CS cz download link
de-of download link
en-gb download link
en-US download link
es-es download link
es-mx download link
fi-fi The download link
en-us download link
en-US download link
it-it download link
-JP ja download link
ko-kr download link
nl-nl download link
pl-pl download link
pt-br download link
ru-ru download link
sv-se download link
ee download link
tr-tr download link
zh-cn The link download
zh-tw download link

Windows 10 x64 build 11099 MIU / LPs

ar-sa download link
cs-cz download link
de-of The link download
en-gb download link
fr- fr download link
es-es download link
es-mx download link
fi-fi download link
en-us download link
en-US download link
it-it download link
ja-jp download link
ko-kr download link
nl-nl download link
pl-pl download link
pt-br download link
ru-ru download link
sv-se Download link
th-th Download link
tr-tr download link
zh-cn download link
zh-tw download link

have a question? See how to install a language MUI CAB file in Windows 10 or leave a comment.

Delete Windows 10 product key from the registry and protect against the theft

13.56 Add Comment
Delete Windows 10 product key from the registry and protect against the theft -

When Windows 10 is installed, it continues to store your product key in the registry. This can be useful if you do not remember what key you used on your current installation. Also, if you have lost your product key, it may be useful to retrieve your product key with a third-party tool or with a simple PowerShell script.

At the same time, your Windows 10 product key is at risk of being stolen. If you are concerned about your product key from being stolen (ie with some malware), you may want to remove it from the base permanently register. This operation is safe and will not affect your operating system activation status. Follow this tutorial to learn how you can delete the product key stored in Windows 10. The same trick will work on Windows 8.1, Windows 7 and Windows Vista as well.

  1. Open an elevated command prompt
  2. In the elevated command prompt you just opened, type the following:.!
     slmgr / cpky 

This is

Windows 10 clear product key from Registry

Here are some explanations for those who want to understand what exactly is happening. slmgr means Software License Manager, it is a Visual Basic script in your Windows System32 folder to manage the granting of licenses related operations. The / cpky slmgr told to delete the product key

Board Bonus :. Even if the product key is deleted, you can still see the partial product key should you ever need to know that affects a particular Windows installation. To view the partial product key, at an elevated command prompt, type:

 slmgr / dli 

Look how it displays the partial product key. If you have a bunch of Windows licenses, this information is sufficient to identify which key product has been used for this installation.

Note that if you install a volume license edition of Windows, only the partial product key can be visible using slmgr / dli. slmgr / cpky is not necessary.

Fix input lag behind in games in Windows 10

22.51 Add Comment
Fix input lag behind in games in Windows 10

- Many players have moved to Windows 10 because of the new features of this operating system offers them. Windows 10 comes with DirectX 12 out-of-the-box and offers graphics performance improvements in games with DirectX 12 support. It also has an Xbox application for tracking of social activity of your game and accomplishments, recording game clips, and streaming of Xbox One. However strange entry on Windows 10, many users have noticed lagging when playing full screen or 3D games.

Windows 10 banner logo devs 02
Enter offsets in games in Windows 10 can happen from time to time or only in certain games. While you can try to help by turning off other programs or think it is due to network latency in multiplayer mode or a problem with your graphics drivers, there may be another reason. For example, the 2010-released StarCraft II game is affected by the delayed entry problem in Windows 10 , even in single-player mode.

After some research, I found a solution.

offsets of input in games on Windows 10 are caused by the DVR feature set of the Xbox app! Once you disable this option, you will not face this problem more

While you can uninstall the Xbox app completely from Windows 10 by using the tutorial in this article :. How to uninstall and remove the Xbox application in Windows 10, it is not suitable for those who need the time to application time for its other features like PC games from Xbox One and social participation of streaming. So simply turn the game DVR and use another application like FRAPS to record and capture content whenever you want.

  1. Run the Xbox application.
  2. Login using your Microsoft account to get access to the application settings.
  3. Click or tap the gear icon in the lower left area of ​​the settings page of the Xbox app.
  4. General tab will be opened by default. Proceed to the next tab, Game DVR
  5. Set "recording game clips and screenshots using the DVR play" to "Off" as shown below: . Windows 10 disable gamedvr

There. You might have solved the input delay problem with games in Windows 10. In comments, please share what games had the input offset for you on Windows 10.

How to add recent files and recent articles in the navigation pane in Windows 10

16.53 Add Comment
How to add recent files and recent articles in the navigation pane in Windows 10 -

In two previous articles, we have examined how to add recent files and recent articles in quick places . The Quick Access folder is the new default location where the file browser opens in Windows 10. If you want to add recent files and / or recent items outside quick as separate items in the left pane (navigation pane), you can apply a simple tweak registy as described below.
Windows 10 recent items and recent folders in nav pane

This tweak will be suitable for those with Handicapped Quick access to be shown in the File Browser using Winaero Tweaker or manually using this guide: How to hide and remove Quick Access icon from the file Explorer in Windows 10.

Winaero Tweaker navigation pane

Remember the How to add new favorites to the navigation pane of Windows Explorer 10? Today we will use exactly the same method to add recent files and recent articles in the navigation pane. They appear as separate items in the left area of ​​the File Explorer.

To avoid modifying the registry, I was about ready to use the registry files that you can download and apply.

Download files from registry

In the ZIP file you downloaded, you will find some .reg files *: Add recent Folders.reg, Add Recent Items. reg and Defaults.reg restoration. Double click the file you want to make changes, then re-open the File Explorer window. There is a folder called "64-bit". If you use 64-bit Windows 10, then you must also merge the appropriate files from this subfolder

If you prefer to do everything manually, do the following :.

first refer to our Registry Editor Guide. Here is how you do the registry settings manually:

Add Recent folders to the navigation pane of the File Explorer in Windows 10

 Windows Registry Editor Version 5.00 [HKEY_CURRENT_USERSOFTWAREClassesCLSID{22877a6d-37a1-461a-91b0-dbda5aaebc99}] @ = "Recent Places" "System.IsPinnedToNameSpaceTree" = dword: 00000001 "SortOrderIndex" = dword: 00000004 [HKEY_CURRENT_USERSOFTWAREClassesCLSID{22877a6d-37a1-461a-91b0-dbda5aaebc99}ShellFolder] "Attributes" = dword: 30040000 [HKEY_CURRENT_USERSOFTWAREMicrosoftWindowsCurrentVersionExplorerDesktopNameSpace{22877a6d-37a1-461a-91b0-dbda5aaebc99}] @ = "Recent Places" [HKEY_CURRENT_USERSOFTWAREMicrosoftWindowsCurrentVersionExplorerHideDesktopIconsNewStartPanel] "{22877a6d-37a1-461a- 91b0-dbda5aaebc99} "= dword: 00000001 

Add recent articles on the navigation pane of the file Explorer in Windows 10

 Windows Registry Editor version 5.00 [HKEY_CURRENT_USERSOFTWAREClassesCLSID{4564b25e-30cd-4787-82ba-39e73a750b14}] @ =" items Recent "" System.IsPinnedToNameSpaceTree "= dword: 00000001" SortOrderIndex "= dword: 00000004 [HKEY_CURRENT_USERSOFTWAREClassesCLSID{4564b25e-30cd-4787-82ba-39e73a750b14}ShellFolder]" Attributes "= dword: 30040000 [HKEY_CURRENT_USERSOFTWAREMicrosoftWindowsCurrentVersionExplorerDesktopNameSpace{4564b25e-30cd-4787-82ba-39e73a750b14}] @ =" Recent Articles "[HKEY_CURRENT_USERSOFTWAREMicrosoftWindowsCurrentVersionExplorerHideDesktopIconsNewStartPanel]" {4564b25e-30CD-4787-82ba- 39e73a750b14} "= dword: 00000001 

There. You have finished!

Microsoft has made a huge leap with the 10 construction numbers

13.52 Add Comment
Microsoft has made a huge leap with the 10 construction numbers - Windows

Microsoft is still working on the Windows 10 kernel codebase called OneCore unify their desktop and development efforts mobile. Gabe Aul Microsoft, vice president of engineering systems in Windows and Devices Group shared some details on progress again via his Twitter. Thank you to Insiders, another interesting fact came to be known on Windows 10 development.

The latest build numbers jumped to 1110x 141xx. For example, Windows 10 build 14251 appears in the Microsoft internal laboratories:

Windows 10 build 14251 Image Credits: @CoreInsiderProg

is known not that exactly the changes are implemented in private builds of Windows 10 except they are refactoring changes OneCore. Currently, Microsoft is working on the Redstone update. As we already know, Redstone would make significant changes to Action Center, Microsoft Edge, Cortana and can also add some integration with Office 365. Cortana services should be extended to an assistant of the entire system. Notification Center / Action Centre could get support for widgets with which you can interact, providing quick snapshots of data synchronized on your Windows 10 machines. Microsoft Edge get the support of extensions: this was confirmed in Windows 10 build 11082, which already has partially implemented this functionality. Another interesting feature of the expected Redstone update Continuation tasks that allow users to start a task on one device and resume and finish on another.

The first update Redstone is slated for release in June 2016 and the second in October 2016, although Microsoft may change these dates and speed up / slow down the exits.

Find your way to the current wallpaper image in Windows 10

19.50 Add Comment
Find your way to the current wallpaper image in Windows 10 -

The image that you use as the wallpaper can be the one that comes by default with Windows 10, or an image from your personal collection. At Winaero, we have a huge set of themes with beautiful wallpapers that you can download free. Your background can also be set by another application as your web browser or desktop Bing that downloads images from the internet. Once you see a picture you like on your desktop, you can find its location on the hard drive so you can save it for later use.

This is a script file (* .VBS) that extracts the path of your current image file wallpaper from the registry and showing it to you. It is very useful, because the only thing you need is to do is double-click the script.

Windows 10 keeps the path to the source image as a binary value in the registry. When you set an image as wallpaper, it will be converted to match your screen and position preferences as filler, zoom, fit, etc. The path to the source image is written in a binary value named TranscodedImageCache in the following registry key:

 HKEY_CURRENT_USER  Control Panel  Desktop 

See capturing following screen: Windows 10 TranscodedImageCache

to extract the path of the image value TranscodedImageCache, you need to run this script:

 Const HKCU = & H80000001 's Computer HKEY_CURRENT_USER = "." Set Oreg = GetObject ( "winmgmts: {impersonationLevel = impersonate} \" & _ & s Computer " root  default: StdRegProv") sKeyPath = "Control Panel  Desktop " sValueName = "TranscodedImageCache" oReg.GetBinaryValue HKCU, sKeyPath , sValueName, sValue sContents = "" For i = 24 To UBound (sValue) vByte = sValue (i) If vByte <> 0 and vByte <> "" Then sContents = sContents & Chr (vByte) End If Next CreateObject ( "Wscript .Shell "). Run "explorer.exe / select", "" sContents & & "" "" 

You can paste this text into Notepad and then save it as a VBS file. Alternatively, you can download the file from here:

Download VBS Script to display your bottom position of the current office

Extract to a folder you want and double click it. Immediately, the folder containing the wallpaper image will open and the image will be selected in the file browser. Here's how it looks in my case :. Windows 10 fnd your wallpaper image

This is

How to see if TRIM is enabled for SSDs in Windows 10

16.49 Add Comment
How to see if TRIM is enabled for SSDs in Windows 10 -

TRIM is a special ATA command that has been developed to maintain the performance of your SSD drives at peak performance for the duration of your life of SSD. Trim tells the SSD controller to erase invalid and unused data blocks from storage in advance, so when a write operation occurs, it ends quickly because little time is spent on operations 'erasure. Without TRIM automatically run at the system level, your SSD's performance will degrade over time unless you manually using a tool that can send the TRIM command to it. So it's always a good idea to check if TRIM is properly enabled for your SSD in Windows 10 and enable it, if disabled.
ssd banner logo As you might be knowing, when you delete all the data on your SSD, Windows brand as deleted. However, the data remains physically on the disk and can be recovered. It is the collection of SSD controller of garbage, wear leveling algorithms that TRIM telling him to wipe the blocks so that they are empty and ready to be rewritten.

Thus, thanks to TRIM, storage blocks that contain the deleted data will be erased and the next time the same area is written, the write operation will be performed more quickly.

How to see if TRIM is enabled for your SSD in Windows 10

to see if TRIM is enabled for your SSD in Windows 10, you must run a single console command from a command prompt high. Do it as follows.

  1. Open an elevated rapid command instance. Windows 10 open command prompt Windows 10 elevated command prompt
  2. Type or paste the following command:
     disabledeletenotify fsutil behavior query 
  3. In the output, a look at DisableDeleteNotify value. If it is 0 (zero) and TRIM is license by the operating system. If disabled, then the value will DisableDeleteNotify 1.

In the following example, TRIM is license for the disk drive on which Windows 10 is installed: Windows 10 check TRIM status

How activate SSD TRIM in Windows 10

to enable TRIM SSD under Windows 10 , you must do the following:

  1. Open an instance of rapid high command
  2. Type or paste the following command: ..
     fsutil behavior set disabledeletenotify 0 

    This will TRIM Support to the solid state drive

  3. If you decide to turn it off in the future, you can do it with the following command:
     fsutil behavior set disabledeletenotify 1 

Windows 10 change TRIM status All these -Dessus also applies to Windows 8 and Windows 7.

There. You have finished. Now, check your state TRIM SSD and tell us what you have and who TRIM status it has in Windows 10.

Windows 10 build 14267 is out for insiders Fast Ring

13.48 Add Comment
Windows 10 build 14267 is out for insiders Fast Ring -

The Fast ring of the Windows Insider program is really fast now: new builds are coming very quickly. Almost FEW days ago we got build 14257, and a newer build released just now. This time it is Windows 10 build 14267.

windows-10 logo banner red
Selon Microsoft, key features of the new build are as Follows:

  • Search for music Easier in Cortana: We-have made it easier to invoke music search in Cortana by Adding a music search icon to the top right of Cortana. You can now open Cortana on your PC and click on the search icon to-have music Cortana listen and search for the song that's playing. cortana-music-searrchpc
  • Favorites bar improvements in Microsoft Edge: Si vous avez la favorite bar in Microsoft Edge enabled, you can now right-click on the favorites bar and choose to have it show only the favicons only. Vous pouvez aussi right-click to add new folders in your favorite bar as well. edge-favorites-bar2-1024x572
    • Clear browsing data When You exit Microsoft Edge: You can now choose your browsing data to-have cleared When You exit Microsoft Edge. Just click on the three dots at the top right in Microsoft Edge and go into Settings, click on the "Choose what to clear" button under "Clear browser data" and enable "Always clear this after-I close the browser" after choosing what data . you want cleared
    • Download Prompts Improved in Microsoft Edge: You can now configure Microsoft Edge to show a prompt When You start a download, ALLOWING you to choose where to save the file. Just open the Microsoft Edge settings pane (the three dots at the top right) and look for the option under "Downloads settings"
    • Messaging + Skype improvements. You can now attach pictures to your Skype messages by clicking close gold tapping on the paperclip icon at the lower left as you're composing a new message to Skype contacts. Additionally, you can aussi invoke the Camera app to take a picture to attach to your Skype messages too or send along your location.

Fixed bugs

The Following Were bugs fixed in this build:

  • Settings> Update & Security> Recovery option will work in this build. In two Previously released builds the operating system unusable after-est devenu you try to use the feature MENTIONED.
  • The WSClient.dll error messages will not APPEAR.
  • The front-facing camera will work on Intel RealSense Camera devices along with Windows Hello.
  • Settings> System> Storage will report correctly the storage capacity.

Windows 10 build 14267 ISO images


winver 14267

Windows 10 build 14267 Was released for Fast Ring insiders only. This means clustering there are no official ISO images available. . To install it from scratch, you need to make your own ISO image from the ESD files received through Windows Update

Download ESD Decrypter for Windows 10 build 14267 | Mirror via Wzór

The twitter user "Lyraull" made a bunch of ISO images. You can find links in The Following tweet:

Here are FEW links from His collection:

  • Windows 10 build 14267 Pro x64
  • Windows 10 build 14267 Pro x86
  • Windows 10 build 14267 Enterprise x64

As you might be already Knowing, recent Insider Preview builds are from the Redstone branch. The Redstone branch Represents the upcoming version of Windows 10 qui Intended to replace / upgrade the steady Existing Windows 10 build 10586 release. As we already know, Redstone is expected to bring significant exchange to Action Center, Microsoft Edge, Cortana and May aussi Add Some integration with Office 365 services. Cortana is expected to be extended to a system-wide assistant. Notification Center / Action Center might get backing for widgets, Offering quick snapshots of data, synced across your Windows 10 devices. Microsoft Edge will get media extensions: This Was confirmed in Windows 10 build 11082, qui already HAS this feature Partially Implemented. Another interesting feature of the update is Redstone Task Continuation qui will allow users to start a task on one device And Then summary and finish it on Reviews another. Windows Redstone is expected to come in two waves, exactly like the Threshold update:

  • Windows 10 build 10240 is the Threshold 1 update
  • Windows 10 build 10586 is the Threshold 2 update. .

The first Redstone update is planned for release in June 2016, and the second one in October 2016, ALTHOUGH Microsoft thesis can shift dates and speed up / slow down the releases.

Disable ads on the lock screen in Windows 10

22.47 Add Comment
Disable ads on the lock screen in Windows 10 -

It has come to our attention that Windows 10 started running ads promoting some applications right on the screen user lock. When the spotlight is on, it also supports third-party applications and store products. Spotlight is only supposed downloads scroll beautiful images. Here's how you can disable the ads promoted for applications.

The lockscreen in Windows 10 has been promoting Ubisoft Rise of the Tomb Raider game for users who had enabled Windows Spotlight to their lock screen. Here is how it looks:

Lock Screen Ads in Windows 10

Disable ads on lockscreen in Windows 10

If you are not happy to see all the ads or applications promoted on the lock screen in Windows 10, here's how you can disable this feature

to disable ads on lockscreen in Windows 10 , do the following :.

  1. Open the settings. app
  2. Go to the next page:
     Personalization  Lock screen 

    Personalization

  3. Under the background option, you can either disable Spotlight Windows by selecting some other option as a "picture" or "slideshow". This will disable Windows Spotlight and its ads completely: Windows 10 lock screen options
  4. Alternatively if you want to keep Windows Spotlight but disable its ads only, you can disable the "Get fun facts, tips, tips, and more on your lock screen "Windows 10 disable lockscreen ads Windows 10 lock screen ads disabled

you can combine the two methods to ensure that Microsoft does not show you ads for paid apps on lock screen. That's it. (Via Lifehacker )

Fix very slow search in Windows 10

19.46 Add Comment
Fix very slow search in Windows 10 -

A number of readers Winaero faced a problem in Windows 10 that after some building upgrades, research becomes slower and consumes a significant amount of processing power. It happens every time the user searches for a file or document using the / search text box Cortana user interface in the taskbar. Here's a solution we found for a fast, responsive search again.

As you might be knowing, the Windows Search results are instantaneous because they are powered by Windows Search indexer. He's new in Windows 10, but Windows 10 uses the same search indexer powered like its predecessors but uses a different algorithm, and another database. It runs as a service that indexes file names, content and properties of elements and file system stored in a special database. There is a list of designated locations indexed in Windows, as well as libraries which are always indexed. So instead of performing a real-time search through files on the file system, the research makes a request to the internal database, allowing to show results immediately.

When you search for a folder or a file that is not in an indexed location, the search is slower by several orders of magnitude. This is exactly what happened in this case after upgrading to Windows 10 build. Some places that should be indexed were missing from the search index.

If this slow Windows 10 research problem affects you, follow these simple steps below to resolve this easily.

  1. Open the Control Panel
  2. go to
     Control Panel  Personalization and Appearance 

    Windows 10 control panel personalization

  3. you will find a Explorer icon named option file :. Windows 10 control panel file explorer options
  4. Open the file Explorer options, go to the View tab and enable the display of hidden objects as shown in the screenshot below. Refer to this article to understand how to show hidden objects. Windows 10 show hidden files and folders
  5. Now open Indexing Options by typing Indexing Options in the search box in the Control Panel, and then click Indexing Options object parameters. Windows 10 search indexing options
  6. Open Indexing Options applet. The Start menu folder must be in the list of indexed locations.If you encounter the problem of slow search results, then in such a case, the Start Menu folder can not be indexed in the list should add locations.You this rear area. Windows 10 indexing options applet
  7. Click the "Edit" button
  8. Add the following folder :.
     C:  ProgramData  Microsoft  Windows  Start Menu 

    Just locate it in the folder tree and check the appropriate box: Windows 10 fix very slow search

  9. Repeat step 6 the following location:
     C:  Users you  username  Menu AppData  Roaming  Microsoft  Windows  Start  

    Windows 10 fix very slow search per user

There. Give Windows a few minutes to index those locations. Then your search in Windows 10 will fast again

I recommend you read the following articles to make your faster and more useful search:

  • search faster applications the Start menu in Windows 10
  • How do I search in Windows 10 Start menu with the disabled search box
  • How to disable the Web search bar of Windows 10 task
  • How to get the Start menu fastest in the world with Windows 10 Classic Shell
  • How search network shares or mapped drives in Windows 10

Windows 10 build 14279 is out for insiders Fast Ring

16.45 Add Comment
Windows 10 build 14279 is out for insiders Fast Ring -

A new build, Windows 10 build 14279 has landed on the Fast Ring. This build comes with a pair of new features and several bugfixes. Unfortunately, it still HAS unresolved issues too. Let's see the change log of Windows 10 build 14279 in detail.

Windows 10 build 14279 winver

Windows 10 build 14279 is a new build from the Redstone branch. Compared to the Previously released build 14271, Microsoft HAS fixed The Following bugs:

  • We fixed an issue Where Microsoft Edge and Cortana Were crashing for users with roaming profiles
  • . we fixed an issue Where Cortana Would continue to show reminders That-have-been completed.
  • we fixed an issue Where items copied / Moved to the desktop Would not display up to the desktop is manually refreshed by right-clicking on the desktop and choosing "Refresh" or pressing F5.
  • We fixed an issue Where downloading some drivers from Windows Update Was Causing some PCs to bluescreen.

For this build, the Following Were fixed selon from Microsoft:

  • We're Investigating year outcome in qui Some Surface Pro 3 Surface Pro 4, Book and Surface devices experience a freeze or hang all input and Such as keyboard / trackpad and touch do not work. The workaround is to hold down the power button to power the device to hard-reboot.
  • We are continuing to track Several issues Reported by Insiders Where Some PCs will freeze or bluescreen When resuming from hibernation. Disabling hibernation is a workaround In Some boxes up to this is fixed.
  • If you-have Kaspersky Anti-Virus, Internet Security, or the Kaspersky Security Suite installed on your PC there is a student Known driver bug That Prevents thesis programs from working as expected builds in from the Development Branch. We are partnering with Kaspersky to fix this issue for a future release, aim at this time there are No known workarounds. While this issue is present, we recommend using Windows Defender Gold Reviews another third party anti-virus product of your choice To Remain protected.
  • Turning on the "always show all icons in the notification area" setting disrupts the layout of the notification area ( "systray"). Your notification area will look out of alignment.
  • We are seeing reports of crashes with apps Such as QQ crashing due to an OS reliability issue we ares currently Investigating. This bug est Impacting older apps Such As Windows Live Mail and Expression Encoder 4.

New features available in Windows 10 build 14279

Windows 10 comes with a build 14279 number of new features. Most of 'em are related to Cortana and search.

  • got Cortana Support for new languages. Now it is available for the Spanish (Mexico), Portuguese (Brazil) and French (Canada) languages. Windows 10 build 14279 cortana

    With this build, we are Enabling Cortana for the Spanish (Mexico), Portuguese (Brazil) or French (Canada) languages! If you're running the Windows 10 Insider Preview in contention languages ​​- Cortana give a try and let us know what you think. For Each new market and language, the Cortana Team works to Develop a custom experience That Is falling in Each individual market and language. For instance, in Brazil - Cortana is bottom of pasteis qui is a common food found in Many regions across Brazil. And in Mexico, we added local flavor to Reflect the focus and language of the country. Aim our work is never full and a big share of our development process is getting feedback from you. These are early That we will versions continues Improve based on your feedback and we look forward to hearing more from you

  • Cortana now allows you to create reminders on the fly.

    With Cortana, you can now save Useful information like the name of a book you want to read (eg "remind me to read [insert book name]"), or a to-do item without a due time (eg "remind me to wash the car"). You have the option to set specific details like location, time, and people at a later time so Cortana That area will MOST icts When it falling. You can always view and edit all of contention in the Sami instead you see your reminders in Cortana today.

  • Windows 10 build 14279 will use the Sámi background image for your Lock Screen and for the logon screen. Once you set the Lock screen background image, it will be used for logon screen too, qui Was Previously hardcoded to the "Windows Hero" image. LVL7vmq
  • Improved performance of IME typing Especially the response. So your typing experience will be smoother than before. Microsoft aussi extended the prediction list so you can select from a 'wider variety of predictions.

Windows 10 build 14279 ISO images

Windows 10 build 14279 Was released Fast Ring for insiders only. This means clustering there are no official ISO images available. This build is Supposed to be installed through the Windows Update service:

Windows 10 build 14279 update

To install it from scratch, you need to make your own ISO image from the ESD files received through Windows Update .

  • Download ESD Decrypter for Windows 10 build 14279
  • Download ESD files for Windows 10 build 14279 from wzór 's cloud.

Twitter user "Lyraull" made a bunch of ISO images. You can find the links in the Tweet Following:

Here are Some links from His collection:

  • 14279.1000.0229-1700.RS1_RELEASE_CLIENTPRO_OEMRET_X64FRE_EN-US.ISO (3.72 GB)
  • 14279.1000.0229-1700.RS1_RELEASE_CLIENTPRO_OEMRET_X86FRE_EN-US.ISO (2.79 GB)
  • 14279.1000.0229-1700 .RS1_RELEASE_CLIENTENTERPRISE_VOL_X64FRE_EN-US.ISO (3.61 GB)
  • 14279.1000.0229-1700.RS1_RELEASE_CLIENTENTERPRISE_VOL_X86FRE_EN-US.ISO (2.69 GB)
  • 14279.1000.0229-1700.RS1_RELEASE_CLIENTCORE_OEMRET_X64FRE_EN-US.ISO (3.71 GB)
  • 14279.1000.0229-1700.RS1_RELEASE_CLIENTCORE_OEMRET_X86FRE_EN-US.ISO (2.80 GB)

As we already know, Redstone is expected to bring significant exchange to Action Center, Microsoft Edge , Cortana and May aussi Add Some integration with Office 365 services. Cortana is expected to Become a system-wide assistant. Notification Center / Action Center might get backing for widgets, Offering quick snapshots of data, synced across your Windows 10 devices. Microsoft Edge will get media extensions: This Was confirmed in Windows 10 build 11082, qui already HAS this feature Partially Implemented. Another interesting feature of the Redstone update is Task Continuation qui will allow users to start a task on one device And Then summary and finish it on Reviews another.

Windows 10 Redstone is expected to come in two waves, exactly like the Threshold update:

  • Windows 10 build 10240 is the Threshold 1 update
  • Windows 10 build 10586 is the Threshold 2 update

The first Redstone.. update is planned for release in June 2016, and the second one in Spring 2017, ALTHOUGH Microsoft thesis can shift dates and speed up / slow down the releases.

Redstone Windows 10 will not include former board calendar

22.43 Add Comment
Redstone Windows 10 will not include former board calendar -

If you prefer Windows 7 as the calendar bar that appears when you click the date to the end of the taskbar, you probably already know that it is possible to recover in Windows 10. there was a simple registry tweak that allowed you to disable the shutter modern date of Windows 10 and restore the good old board calendar with the analogue clock. Microsoft has decided to eliminate this possibility.

Previously, we wrote how to get the old 7 as the timing and date Windows Sidebar in Windows 10. In short, the user can apply a simple registry tweak:

 Windows Registry Editor version 5.00 [HKEY_LOCAL_MACHINESOFTWAREMicrosoftWindowsCurrentVersionImmersiveShell] "UseWin32TrayClockExperience" = dword: 00000001 

After this, the Metro schedule in the system tray has changed his look of this:
Windows 10 new date pane

this: Windows 10 old calendar and date pane

Personally, I prefer the old calendar tray because it opened a lot faster than its counterpart Metro. It also showed an analog clock to the current system and additional analog clocks for two time zones. It was a native code implementation and one of the first settings I apply in Windows 10.

It seems that Microsoft decided not to include this option in the future legacy Windows 10 update Redstone because it was a tweak probably undocumented. The recent Windows 10 build Redstone published insiders, build 14291, does not have this option working. The registry tweak mentioned does not matter.

In fact, this is not a surprise. It was probably included only as an interim measure for compatibility until the new managed code based on XAML user interface has been thoroughly tested. Now that some versions of Windows 10 have the new code, Microsoft must have decided to make the entire UI of Windows 10 available in the modern style / "Universal" only by removing all the classic features and options and replace them with Metro equivalents. The Settings application is also slowly inherits all settings from the control panel. There are also rumors of a touch-friendly browser app. Ultimately, the classic control panel will be removed from Windows 10. Most recently, the taskbar properties have been added to the Settings app. It is quite possible that other registry tweaks to bring the classic functionality will also be phased out.

What do you think of this change? Will you miss the calendar option removed?